Getting Started
Sign In
Translator Pro uses social sign-in — no separate registration required. You can sign in with a Google, Naver, or Kakao account.
- On the login page, click the "Continue with..." button for the account you want to use.
- Select your account and complete authentication.
- Once signed in, you are taken to the project list page.
Supported Languages
Translation is currently supported between the following 23 languages.
Project Management
Project List
After signing in, the /projects page shows all your projects as cards. Each card displays the project name, target language, total pages, last viewed page, and last modified date.
Creating a Project
- Click the "Create Project" button on the project list page.
- Set the project name, target language (default: Korean), and PDF file.
- Click "Create Project" to create it.
Deleting a Project
Click the delete button on a project card, then confirm in the dialog.
Workspace
Opening a project takes you to a document-editor style translation workspace.
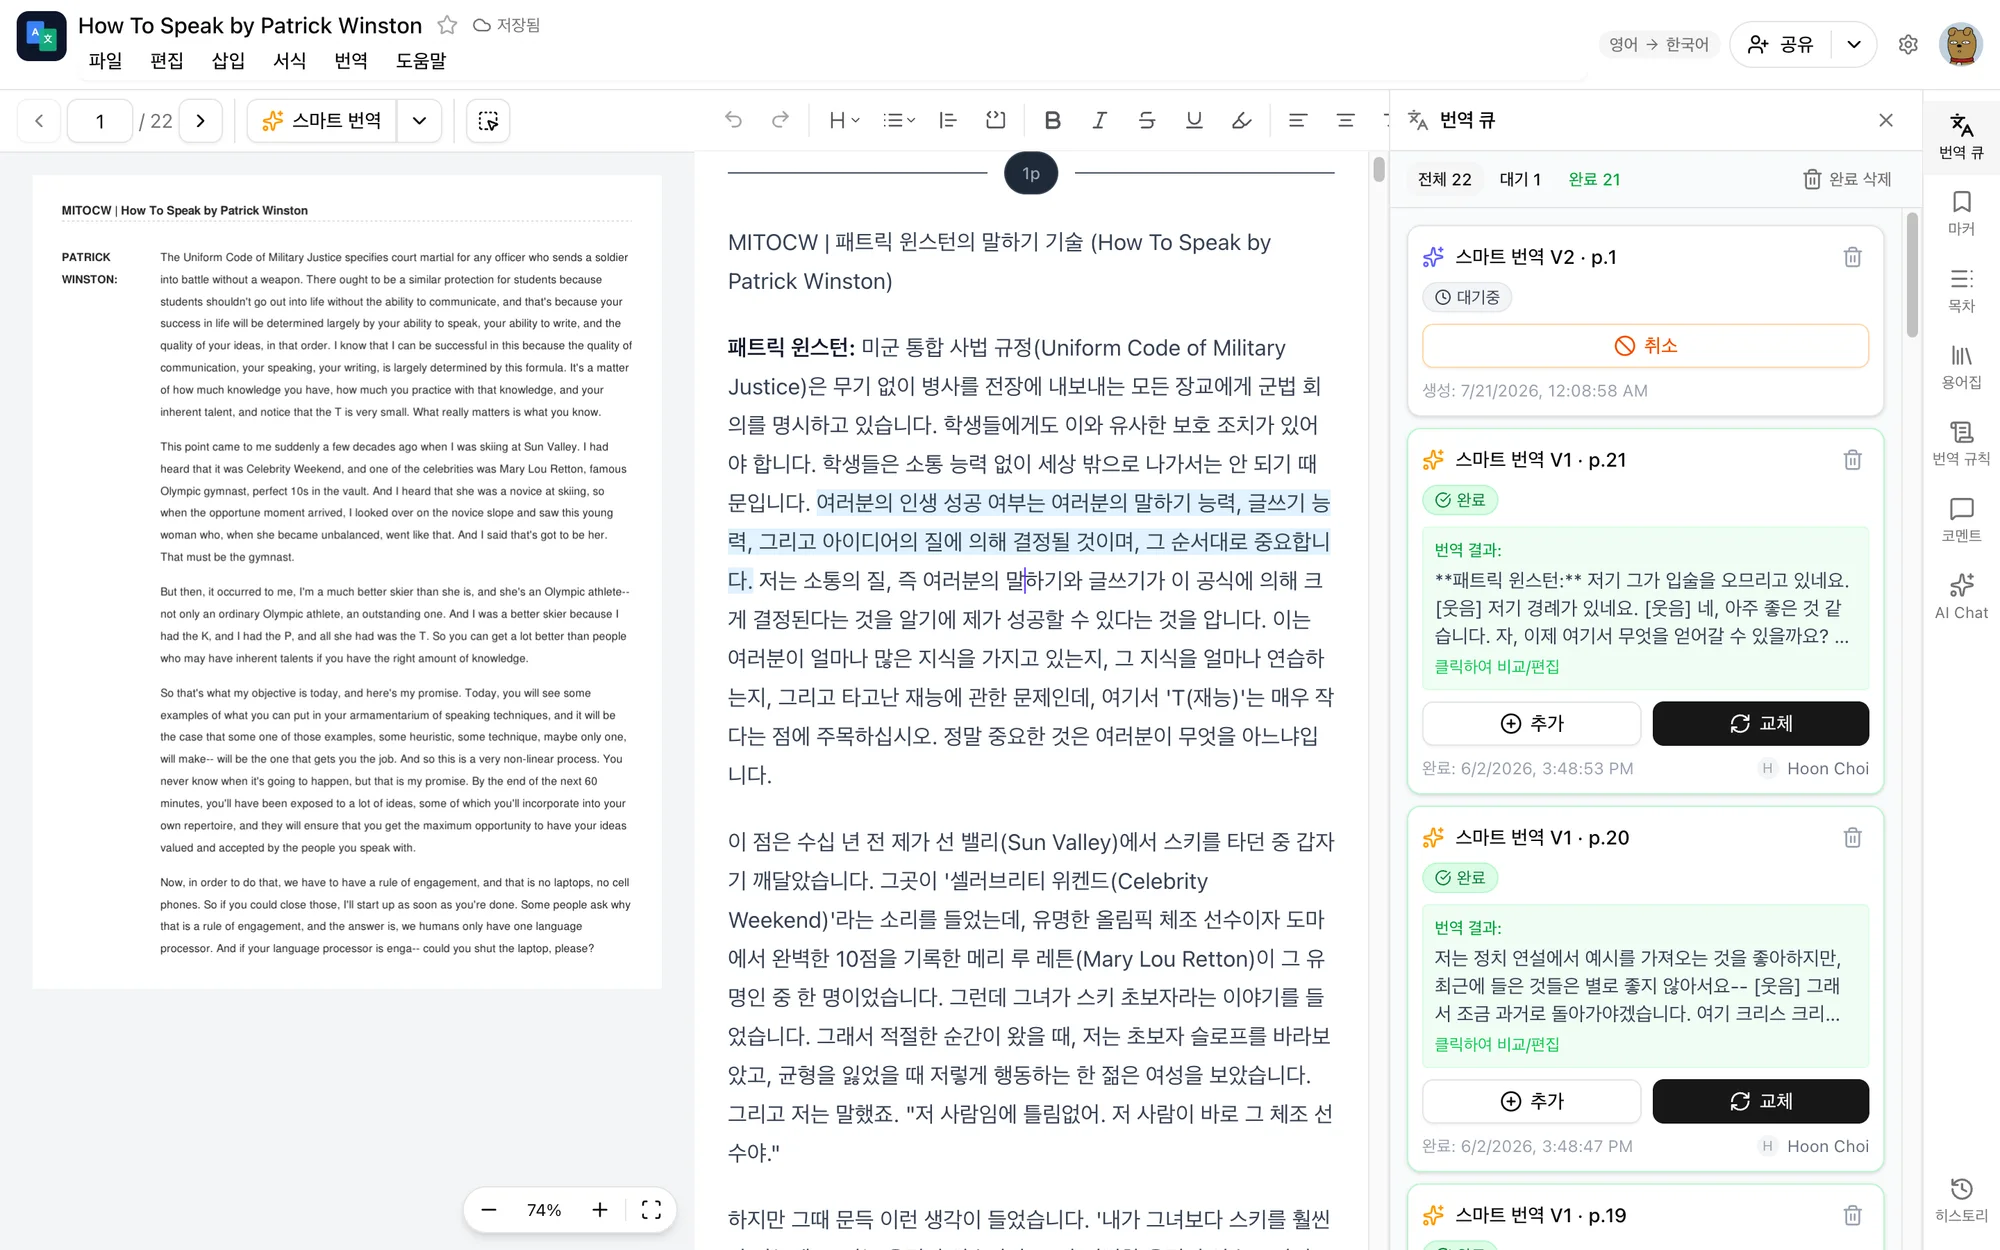
Header and Menus
At the top you'll find a header with the project name, save status, members currently viewing, and the Share button, plus the File · Edit · Insert · Format · Translate · Help menus. Most features can be found in these menus.
Layout
The screen has three columns, left to right: the PDF viewer, the translation editor, and the side panel. The layout adapts automatically to your screen size.
Tablet (1025px–1439px): two panes, with the side panel opening as a drawer on the right
Mobile (1024px and below): three switchable tabs — Original PDF · Translation · Utilities
Resizing Panels
Drag the divider between panels to resize them freely. The adjusted layout is saved automatically per project.
Auto Save
Everything you edit is saved automatically in real time. There is no save button or shortcut to press.
You can check the save status in the header.
- Saved:all changes are synced
- Saving...:changes are being synced to the server
- Offline:the connection was lost. Syncing resumes automatically once you're back online
PDF Viewer
Page Navigation
| Method | Description |
|---|---|
| Previous/Next buttons | Move between pages with the arrow buttons in the toolbar |
| Page number input | Type a page number and press Enter |
| Keyboard shortcut | Cmd/Ctrl + PageUp/PageDown |
| Overscroll | Keep scrolling past the end of a page to move automatically |
| Click a page marker | Clicking a marker in the editor jumps to that PDF page |
Zoom
Use the +/- buttons in the toolbar to zoom between 10% and 300%.
Select a Region to Attach to AI Chat
Turn on the region-select button in the PDF toolbar, then drag over the area you want. An "Attach to chat" button appears, and you can ask AI Chat to translate or answer questions about the attached image.
AI Translation
Starting a Translation
Press the translate button in the PDF viewer toolbar to translate the current page. The button shows which translation engine is active, and the arrow next to it lets you switch engines or choose batch translation. The same actions are available in the Translate menu at the top.
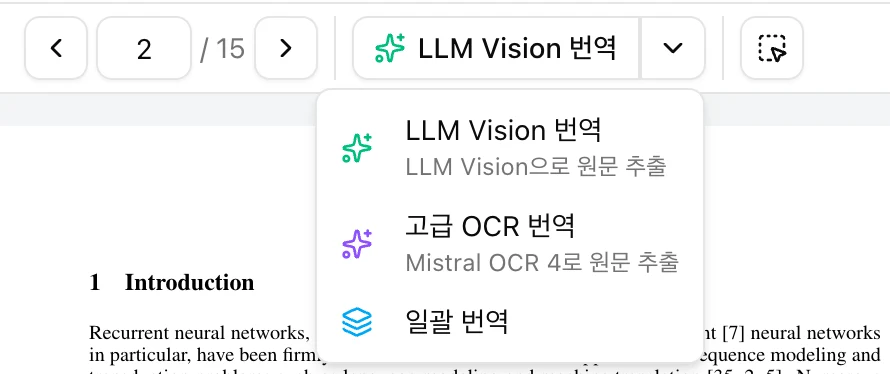
Two translation engines
Press the arrow next to the translate button to choose between two engines. Smart Translation (the default) reads the page as an image, understanding context and page boundaries as it translates — 1 credit per page. Advanced Translation first extracts the source text with a dedicated OCR model (Mistral OCR 4), so compared with the LLM approach it hallucinates less, is more accurate, and pinpoints the position of figures and tables far more precisely. For documents heavy with tables, formulas, or complex layouts we recommend Advanced Translation — 2 credits per page (figures translated within a page add 9 credits each). Both engines automatically detect blank pages and paragraphs continued from the previous page, and the engine you pick is remembered as the default next time.
- Navigate to the page you want to translate, then press the translate button to use the shown engine, or use the arrow to pick a different one.
- The job is added to the translation queue in the side panel.
- Its status updates in real time: Queued → Processing → Done.
- When finished, the translation is inserted into the editor along with a page marker (if auto-insert is on).
Batch Translation
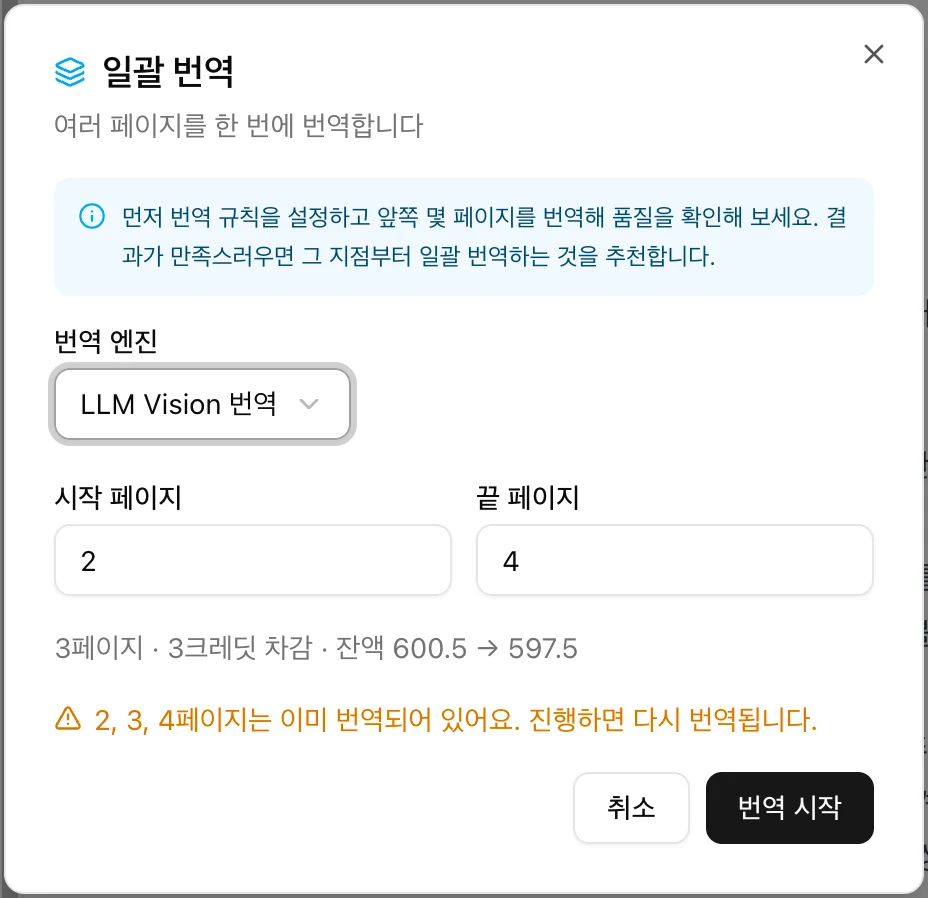
Use this to translate multiple pages at once. Choose a translation engine and set the page range in the dialog, and the estimated credit cost and remaining balance are shown together.
- Click the arrow on the translate button and choose "Batch translate".
- Set the start and end pages.
- Press "Start translation" — a job is created for each page and processed in order.
If the range includes pages that are already translated, you'll see a notice that they will be translated again. Setting up your translation rules and glossary first leads to better results.
Auto Insert
When a translation finishes, the result is inserted into the editor automatically along with a page marker.
- If the page already has content, auto-insert is skipped. You can review the result in the translation queue and apply it yourself.
- You can turn auto-insert off in Project Settings → General (default: on).
Duplicate Translation Warning
If a job for the page is already running, or the editor already has content for it, a "There is already a translation" dialog appears. Choose "Continue" to translate anyway, or "Cancel" to abort the request.
Managing Translation Jobs
Manage all translation jobs in the translation queue in the side panel.
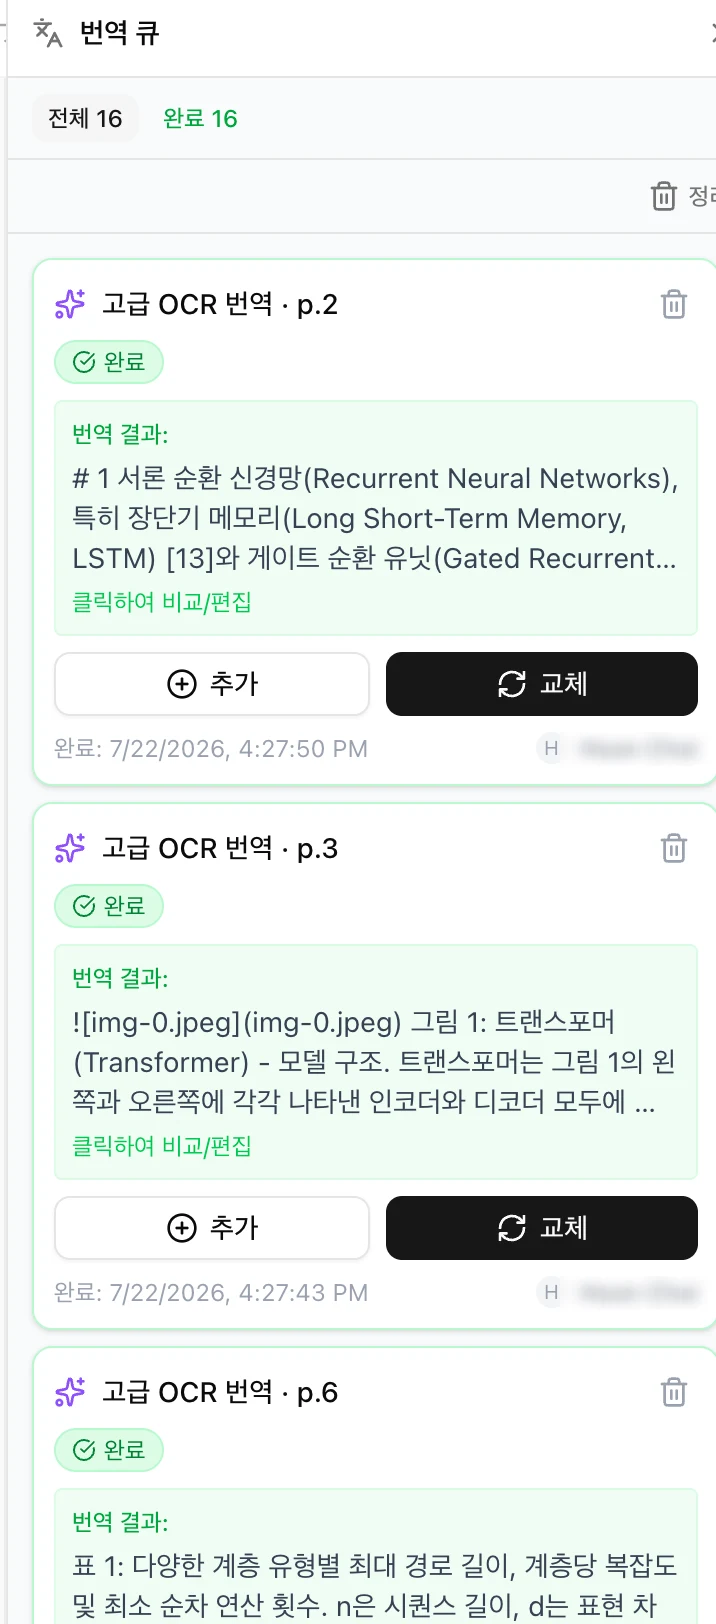
Status Filters
Job Card Actions
| Action | Description |
|---|---|
| Click the result | Click a finished job's result to open the compare & edit view |
| Append | Add the translation to the editor |
| Replace | Replace the page's existing content with the translation |
| Retry | Re-run a failed or cancelled job with the same settings |
| Cancel | Stop a queued or running job |
| Delete | Remove the job from the queue |
Compare & Edit View
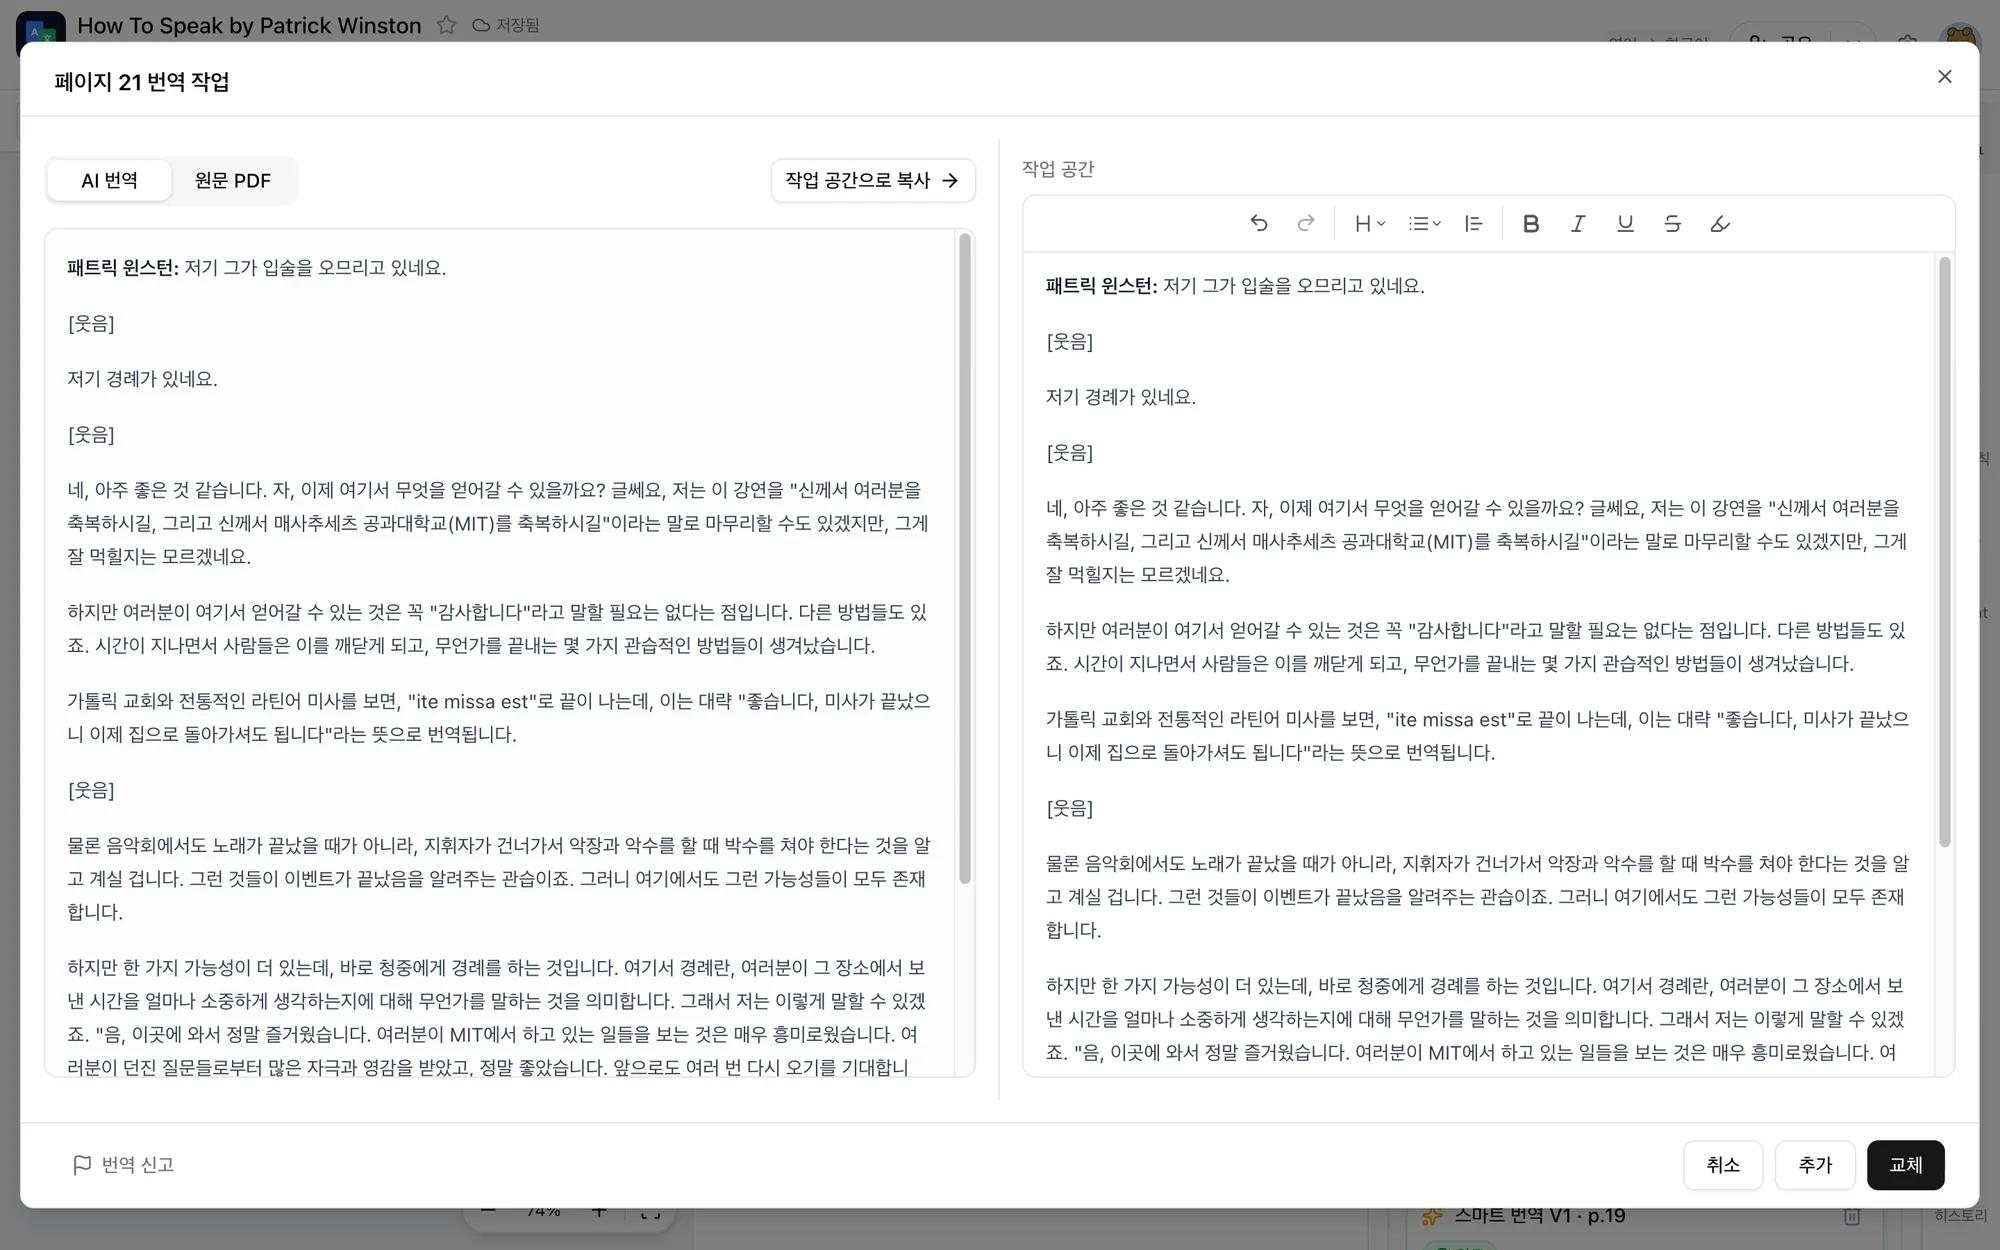
On the left, switch between the AI translation and the original PDF page. On the right is an editable workspace. Use "Copy to workspace" to bring in the AI translation, polish it, then apply it to the editor with "Append" or "Replace".
Reporting a Translation
If a translation looks wrong, use the "Report translation" button in the compare & edit view. Reported pages are reviewed and used to improve translation quality.
Translation Rules
In the Translation Rules tool in the side panel, you can write instructions the AI follows while translating (up to 5,000 characters).
- Always translate "machine learning" as "머신러닝"
- Use formal tone
- Keep technical terms bilingual, e.g. 인공지능(AI)
Translation Editor
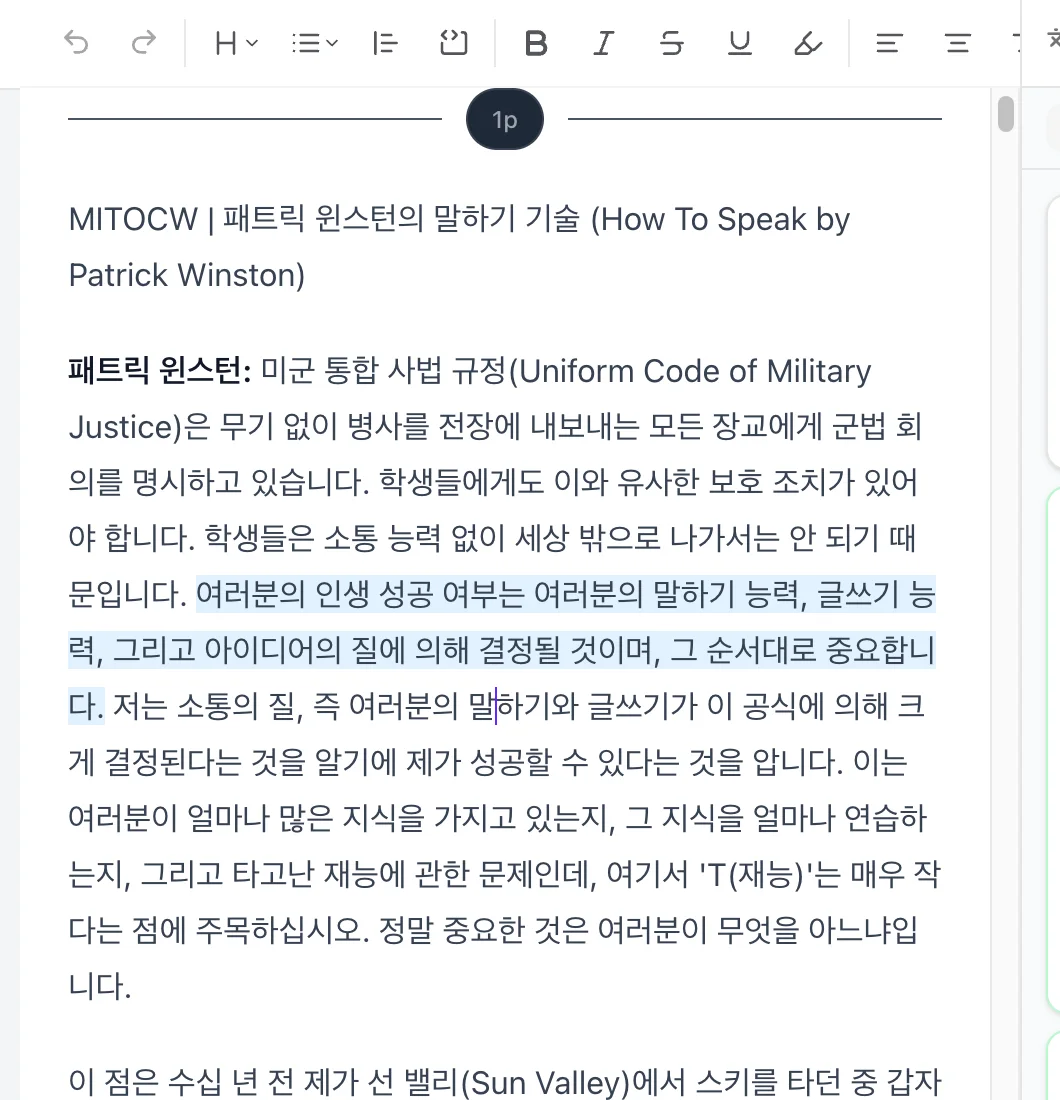
Polish your translations in the rich text editor at the center of the workspace. Every editing feature is available from the editor toolbar and the top menus (Edit · Insert · Format).
Text Formatting
Character Formatting
| Format | Shortcut |
|---|---|
| Bold | Cmd/Ctrl + B |
| Italic | Cmd/Ctrl + I |
| Underline | Cmd/Ctrl + U |
| Strikethrough | Cmd/Ctrl + Shift + X |
| Superscript | Cmd/Ctrl + . |
| Subscript | Cmd/Ctrl + , |
Block Elements
Footnotes
Add a footnote at the cursor via Insert → Footnote or the keyboard shortcut. Footnote content is collected at the bottom of the page and numbering is automatic. When the body has a footnote number but no content below it, right-click the number and choose "Add footnote content" to create the entry.
Math
Insert equations with the math button in the toolbar. Double-click an equation to open the editing popover. LaTeX syntax is supported.
Images
Upload images from the Insert menu, or paste and drag them in. Double-click an image to enter non-destructive crop mode. For figures translated by AI, click the figure to select it and ask AI Chat to translate it again.
Find & Replace
Use Edit → Find and replace to search the whole document and replace text in one go.
Table Editing
Use the Format menu or right-click inside a table to insert/delete rows and columns, merge/split cells, and toggle the header row.
More
- Text color and highlighter
- Text alignment (left, center, right, justify)
- Inline code and links
- Paste without formatting, clear formatting
Page Markers
Page markers indicate PDF page boundaries inside the editor. They are created automatically when translations are inserted, and you can also add them yourself.
Adding a Marker
- Navigate to the page you want in the PDF viewer.
- Place the cursor where you want the marker in the editor.
- Click the page marker button in the toolbar, or press Cmd/Ctrl + Shift + M.
Using Markers
- Click a marker in the editor to jump to that PDF page.
- Double-click a marker to change its page number.
- See all markers as a list in the Markers tool in the side panel.
Side Panel
Pick a tool from the icon bar on the right side of the workspace to open the side panel. On mobile, the same tools live under the "Utilities" tab.
Translation Queue
Track and manage translation jobs and their results, with status filters and a "Clear completed" button.
Markers
Shows every page marker in the document in page order. A progress bar at the top shows how far the translation has come, and clicking a marker jumps to that PDF page.
Table of Contents
Shows the editor's headings (H1–H3) as a live table of contents. Click an entry to jump to it.
Glossary
Manage the project's translation glossary. See the glossary guide for details.
Translation Rules
Write instructions the AI follows while translating (up to 5,000 characters).
Comments
See all comments in the document in one place. The unread count appears on the icon.
AI Chat
An AI assistant that understands your workspace. See the AI Chat guide for details.
History (coming soon)
Tracks translation history. Coming soon.
Glossary
Consistent terminology is critical in translation. If "machine learning" becomes "기계학습" on one page and "머신러닝" on another, the document loses consistency. Register source-target term pairs in the glossary and the AI will use your chosen translation for those terms.
Adding a Term
- Open the Glossary tool in the side panel.
- Enter the source term in the source field. (e.g. machine learning)
- Enter the translation in the target field. (e.g. 머신러닝)
- Optionally add a note in the memo field.
- Click the "Add" button.
Editing a Term
- Click the row of the term you want to edit.
- Edit the source term, translation, or memo.
- Click the check button to save, or the X button to cancel.
Deleting a Term
Click the trash icon on the right side of a term's row to delete it immediately.
How the Glossary Applies to Translations
Registered terms are applied automatically to every AI translation — smart translation, batch translation, and retranslation via AI Chat. When a translation runs, the glossary is passed to the AI in a structured format, instructing it to use your chosen translations.
Glossary vs. Translation Rules
Translation rules and the glossary complement each other.
| Glossary | Translation Rules | |
|---|---|---|
| Format | Source-target term pairs | Free-form text |
| Purpose | Consistent translation of specific terms | General guidance: style, tone, direction |
| Example | API → API, ML → 머신러닝 | "Use a formal tone" |
| Priority | High | Low |
Limits
- Up to 200 terms per project. The current count is shown at the top of the list.
- Glossaries are per-project and not shared across projects.
- AI compliance is not guaranteed to be 100%. The structured format achieves high compliance, but exceptions can occur in complex contexts.
AI Chat
AI Chat in the side panel is an assistant that understands your workspace. It knows the PDF page you're viewing, the editor content, and whatever text or figure you've selected — so you can ask for things in plain language.

What It Can Do
- "Translate page 5" — runs a page translation
- "Retranslate this paragraph more naturally" — retranslates the selected paragraph or figure
- "Go to page 23" — navigates the PDF
- Reads the editor content and answers questions about it
Propose, Then Approve
Requests that modify the editor are never applied directly. The AI proposes the change as a preview card, and nothing happens until you press "Apply". If you don't like it, just dismiss it.
Attaching Context
Text or figures you select in the editor are attached to the conversation automatically. You can also drag-select a region of the PDF to attach it as an image (see the PDF Viewer section). Attached figures can even be cropped, translated on their own, and inserted into the editor.
Collaboration
Share a project with teammates and translate together.
Inviting Members
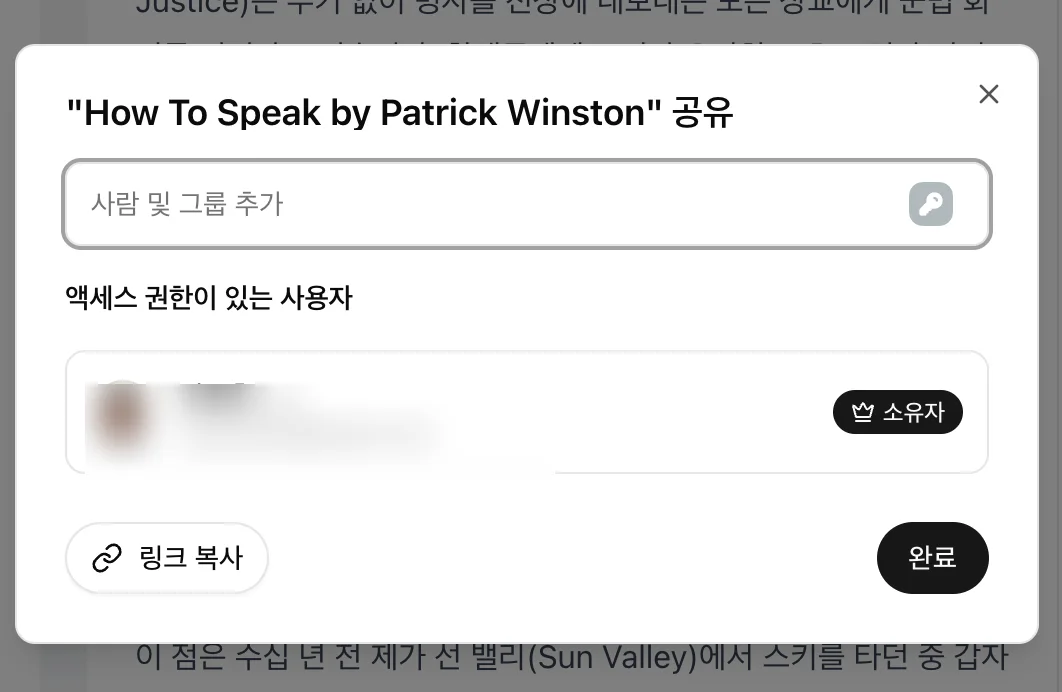
- Click the "Share" button in the workspace header.
- Enter the invitee's email and choose a role.
- Sending the invite creates an acceptance link. You can also copy the link and share it directly.
Roles and Permissions
| Role | Permissions |
|---|---|
| Owner | Full access, project deletion, member management |
| Editor | Run translations and edit content |
| Commenter | View and write comments |
| Viewer | Read-only |
Real-Time Co-Editing
When several people open the same project, their avatars appear in the header and each person's cursor and selection show up in the editor in their own color. Edits sync to everyone in real time.
Comments
Select some text and choose Insert → Comment to start a comment thread on that range. The Comments tool in the side panel collects every thread so you can read and reply in one place.
Export
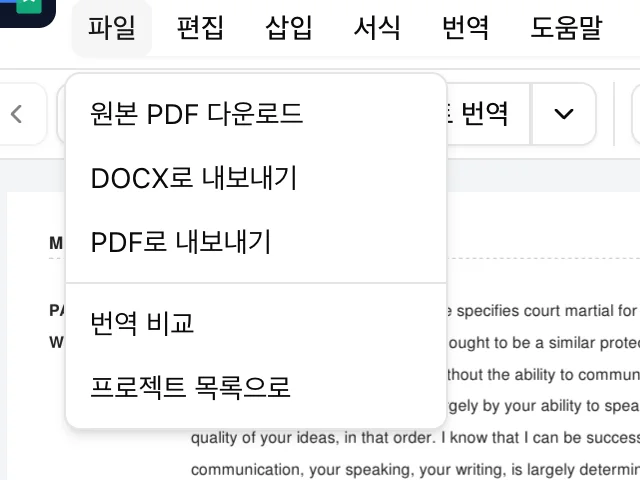
Export your finished translation from the File menu at the top.
Export as DOCX
Saves a document you can open in Word. Equations are converted to native Word math.
Export as PDF
Saves the translated document as a PDF file.
Download Original PDF
Downloads the original PDF you uploaded to the project.
Project Settings
Open project settings from the settings button in the workspace header.
General
- Project info: change the name and target language
- Translation settings: toggle auto-insert on completion (default: on)
- Danger zone: permanently delete the project
Keyboard Shortcuts
Workspace
| Shortcut | Action |
|---|---|
| Cmd/Ctrl + Shift + M | Insert page marker |
| Cmd/Ctrl + Shift + H | Find and replace |
| Cmd/Ctrl + Alt + F | Insert footnote |
| Cmd/Ctrl + PageUp | Previous PDF page |
| Cmd/Ctrl + PageDown | Next PDF page |
Text Editing
| Shortcut | Action |
|---|---|
| Cmd/Ctrl + B | Bold |
| Cmd/Ctrl + I | Italic |
| Cmd/Ctrl + U | Underline |
| Cmd/Ctrl + Shift + X | Strikethrough |
| Cmd/Ctrl + . | Superscript |
| Cmd/Ctrl + , | Subscript |
| Cmd/Ctrl + Z | Undo |
| Cmd/Ctrl + Y | Redo |
| Cmd/Ctrl + Shift + V | Paste without formatting |
| Cmd/Ctrl + \ | Clear formatting |
FAQ
Can I change the PDF file later?
No. The PDF uploaded at project creation cannot be changed. To translate a different PDF, create a new project.
What if a translation job fails?
Find the failed job in the translation queue and click "Retry" to run it again with the same settings.
Can I edit the translation myself?
Yes. Content inserted into the editor is fully editable. Before inserting, you can also click a job's result in the queue and polish it in the compare & edit view.
Can I translate multiple pages at once?
Yes. Click the arrow on the translate button, choose "Batch translate", and set a page range. A job is created per page and processed in order.
What happens with blank pages or paragraphs that continue across pages?
Smart translation detects them automatically. Blank pages are labeled as such, and pages that only continue a previous paragraph are marked as included in the previous page's translation.
Can I change the AI translation model?
The AI model is selected automatically by the system — no manual selection needed.
How do I save my work?
You don't have to. Edits are saved automatically in real time, and the "Saved" indicator in the header shows the current status.
What if a translation looks wrong?
Use the "Report translation" button in the compare & edit view to let us know. You can also hit "Retry" to translate again.
Can I turn off auto-insert?
Turn off the "Auto-insert on completion" switch in Project Settings → General. With auto-insert off, review and insert results manually from the translation queue.
Can I work on a project with others?
Yes. Invite members with the "Share" button in the header. Permissions depend on the role (Editor · Commenter · Viewer), and everyone edits together in real time.
Translation Workflow
Basic Translation Flow
- 1Create a project (name, target language, PDF upload)
- 2Review the PDF in the workspace
- 3Click the translate button — use "Batch translate" for multiple pages
- 4Watch progress in the translation queue (updates in real time)
- 5Check the translation auto-inserted into the editor
- 6If needed, click a result to compare & edit, then append/replace
- 7Polish formatting, footnotes, and images in the editor
- 8Manage quality with the glossary and translation rules
- 9Ask AI Chat to retranslate awkward paragraphs
- 10Export as DOCX/PDF from the File menu